
Maintaining Data Integrity
DownLoad Link at the Last:
Youtube Video Link:
Objectives
After completing this lesson, you should be able to do the following:
Implement data integrity constraints
Maintain integrity constraints
Obtain constraint information from the data dictionary
Data Integrity

Data Integrity
Data integrity means that data in a database adheres to business rules. There are three primary ways in which data integrity can be maintained:
Application code
Database triggers
Declarative integrity constraints
Mapping the business rules using one of the three methods is a design decision. The database administrator is primarily concerned with implementing the methods chosen by the designer and balancing the performance needs against integrity requirements.
Application code can be implemented either as stored procedures within the database or as applications running on the client. This lesson focuses on the use of integrity constraints.
Database triggers:
Database triggers are PL/SQL programs that are executed when an event, such as an insert or an update of a column, occurs on a table. Triggers can be enabled or disabled—that is, they can be set to execute when the event occurs, or they can be set not to execute even though they are defined. Database triggers are usually created only to enforce a complex business rule that cannot be defined as an integrity constraint.
Note: Database triggers are covered in other Oracle courses.
Integrity constraints:
Integrity constraints are the preferred mechanism for enforcing business rules because they:
Provide improved performance
Are easy to declare and modify—they do not require extensive coding
Centralize rules
Are flexible (enabled or disabled)
Are fully documented in the data dictionary
The following sections explain the behavior of integrity constraints and discuss how they are implemented by the Oracle server.
Types of Constraints

Types of Constraints
By default, all columns in a table allow nulls. Null means the absence of a value. A NOT NULL constraint requires that a column of a table contain values.
A UNIQUE key constraint requires that every value in a column or set of columns (key) be unique. No two rows in a table can have duplicate values in a specified column or set of columns.
Each table in the database can have at most one PRIMARY KEY constraint. A PRIMARY KEY constraint ensures that both of the following are true:
No two rows in a table can have duplicate values in the specified column.
Primary key columns do not contain NULL values
A CHECK integrity constraint on a column or a set of columns requires that a specified condition be true or unknown for every row of the table.
Although the NOT NULL and CHECK constraints do not directly require DBA attention, the PRIMARY KEY, UNIQUE, and FOREIGN KEY constraints must be managed to ensure high availability and acceptable performance levels.
Constraint States
Constraint States
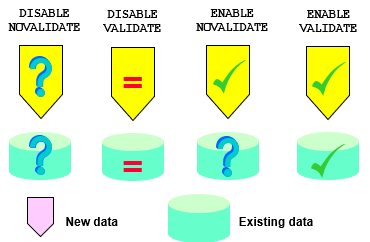
An integrity constraint can be enabled (ENABLE) or disabled (DISABLE). If a constraint is enabled, data is checked as it is entered or updated in the database. Data that does not conform to the constraint’s rule is prevented from being entered. If a constraint is disabled, then data that does not conform can be entered into the database. An integrity constraint can be in one of the following states:
DISABLE NOVALIDATE
DISABLE VALIDATE
ENABLE NOVALIDATE
ENABLE VALIDATE
DISABLE NOVALIDATE: A constraint that is DISABLE NOVALIDATE is not checked. Data in the table, as well as new data that is entered or updated, may not conform to the rules defined by the constraint.
DISABLE VALIDATE: If a constraint is in this state, then any modification of the constrained columns is not allowed. In addition, the index on the constraint is dropped and the constraint is disabled. Note: The index is not dropped if the constraint is deferrable.
ENABLE NOVALIDATE: If a constraint is in this state, new data that violates the constraint cannot be entered. However, the table may contain data that is invalid—that is, data that violates the constraint. Enabling constraints in the NOVALIDATE state is most useful in data warehouse configurations that are uploading valid OLTP data.
ENABLE VALIDATE: If a constraint is in this state, a row that violates the constraint cannot be inserted into the table. However, while the constraint is disabled such a row can be inserted. This row is known as an exception to the constraint. If the constraint is in the ENABLE NOVALIDATE state, then the violations resulting from data that is entered while the constraint is disabled remain. The rows that violate the constraint must be either updated or deleted in order for the constraint to be put in the validated state.
When a constraint changes to ENABLE VALIDATE from a disabled state, the table is locked and all data in the table is checked for conformity. This may cause DML operations such as a data load to wait, so it is advisable to move first from a disabled state to ENABLE NOVALIDATE, and then to ENABLE VALIDATE.
Transitions between these states are governed by the following rules:
ENABLE implies VALIDATE, unless NOVALIDATE is specified.
DISABLE implies NOVALIDATE, unless VALIDATE is specified.
VALIDATE and NOVALIDATE do not have default implications for the ENABLE and DISABLE states.
When a unique or primary key moves from the DISABLE state to the ENABLE state and there is no existing index, a unique index is created automatically. (The exception will exist if the index is deferrable.) Similarly, when a unique or primary key moves from ENABLE to DISABLE and it is enabled with a unique index, the unique index is dropped.
When any constraint is moved from the NOVALIDATE state to the VALIDATE state, all data must be checked. However, moving from VALIDATE to NOVALIDATE, it simply forgets that the data was ever checked.
Moving a single constraint from the ENABLE NOVALIDATE state to the ENABLE VALIDATE state does not block reads, writes, or other DDL statements.

Constraint Checking
You can defer checking constraints for validity until the end of the transaction.
Nondeferred or immediate constraints:
Nondeferred constraints, also known as immediate constraints, are enforced at the end of every DML statement. A constraint violation causes the statement to be rolled back. If a constraint causes an action such as delete cascade, then the action is taken as part of the statement that caused it. A constraint that is defined as nondeferrable cannot be modified to be enforced at the end of a transaction.
Deferred constraints:
Deferred constraints are constraints that are checked only when a transaction is commited. If any constraint violations are detected at commit time, the entire transaction is rolled back. These constraints are most useful when both the parent and child rows in a foreign key relationship are entered at the same time, as in the case of an order entry system, where the order and the items in the order are entered at the same time.
A constraint that is defined as deferrable can be specified as one of the following:
Initially immediate specifies that by default it should function as an immediate constraint, unless explicitly set otherwise.
Initially deferred specifies that by default the constraint should be enforced only at the end of the transaction.
Defining Constraints Immediate or Deferred
Use the SET CONSTRAINTS statement to make constraints either DEFERRED or IMMEDIATE.
The ALTER SESSION statement also has clauses to SET CONSTRAINTS to DEFERRED or IMMEDIATE.
Defining Constraints Immediate or Deferred
The SET CONSTRAINTS statement makes constraints either DEFERRED or IMMEDIATE for a particular transaction. You can use this statement to set the mode for a list of constraint names or for constraints. The SET CONSTRAINTS mode lasts for the duration of the transaction or until another SET CONSTRAINTS statement resets the mode. The SET CONSTRAINTS statement is disallowed inside triggers.
The ALTER SESSION statement also has clauses to SET CONSTRAINTS to IMMEDIATE or DEFERRED. This command implies setting ALL deferrable constraints (list of constraint names cannot be specified). The ALTER SESSION SET CONSTRAINTS statement applies to a current session only.
ALTER SESSION
SET CONSTRAINT[S] =
{IMMEDIATE|DEFERRED|DEFAULT}
SET CONSTRAINT | CONSTRAINTS
{constraint |ALL }
{IMMEDIATE|DEFERRED}
Primary and Unique Key Enforcement

Primary and Unique Key Enforcement
Primary and unique keys are enforced using indexes. You can control the location and type of index that is used for enforcing these constraints.
The Oracle server uses the following procedure to implement unique and primary key constraints:
If the constraint is disabled, no indexes are needed.
If the constraint is enabled and the columns in the constraint form the leading part of an index, the index is used to enforce the constraint whether the index itself was created as unique or nonunique.
If the constraint is enabled and there is no index that uses the constraint columns as a leading part of the index, then an index with the same name as the constraint is created using the following rules:
If the key is deferrable, a nonunique index on the key column is created.
If the key is nondeferrable, a unique index is created.
If an index is available for use and the constraint is nondeferrable, then use the existing index. If the constraint is deferrable and the index is nonunique, then use the existing index.
Foreign Key Considerations

Foreign Key Considerations
You should consider several factors when you maintain tables that are in a foreign key relationship.
DDL involving parent table:
The foreign key must be dropped before dropping the parent table. The following single statement can be used to perform both actions:
DROP TABLE table CASCADE CONSTRAINTS
The parent table cannot be truncated without dropping or disabling the foreign key.
The foreign key must be dropped before the tablespace containing the parent is dropped. You can achieve this by using the following command:
DROP TABLESPACE tablespace INCLUDING CONTENTS
CASCADE CONSTRAINTS
If the DELETE CASCADE option is not used when rows are deleted from the parent table, the Oracle server must ensure that there are no rows in the child table with the corresponding foreign key. Similarly, an update to the parent key is permitted only when there are no child rows with the old key value. If there is no index on the foreign key on the child table, the Oracle server locks the child table and prevents changes to ensure referential integrity. If there is an index on the table, the referential integrity is maintained by locking the index entries and avoiding more restrictive locks on the child table. If both tables must be updated concurrently from different transactions, create an index on the foreign key columns.
When data is inserted into the child table, or the foreign key column is updated in the child table, the Oracle server checks the index on the parent table that is used for enforcing the referenced key. Therefore, the operation succeeds only if the tablespace that contains the index is online. Note that the tablespace that contains the parent table does not need to be online to perform DML operations on the child table.
Oracle9i no longer requires a share lock on unindexed foreign keys when doing an update or delete on the primary key. It still obtains the table-level share lock, but then releases it immediately after obtaining it. If multiple primary keys are updated or deleted, the lock is obtained and released once per row.

Defining Constraints While Creating a Table
A constraint can be defined either when a table is created or when a table is altered. Use the constraint_clause clause in a CREATE TABLE or ALTER TABLE statement to define a constraint. You must have the requisite privileges to define an integrity constraint. To create a referential integrity constraint, the parent table must be in your own schema, or you must have the REFERENCES privilege on the columns of the referenced key in the parent table.
The column_constraint syntax is part of the table definition. At the time the table is created, you can define the constraint by using the following syntax:
column datatype [CONSTRAINT constraint]
{[NOT] NULL
|UNIQUE [USING INDEX index_clause]
|PRIMARY KEY [USING INDEX index_clause]
|REFERENCES [schema.]table [(column)]
[ON DELETE CASCADE]
|CHECK (condition)
}
constraint_state :==
[NOT DEFERRABLE|DEFERRABLE [INITIALLY {IMMEDIATE|DEFERRED}]
]
[DISABLE|ENABLE [VALIDATE|NOVALIDATE]]
where:
CONSTRAINT: Identifies the integrity constraint by the name constraint stored in data dictionary
USING INDEX: Specifies that the parameters defined in the index_clause should be used for the index that the Oracle server uses to enforce a unique or primary key constraint (The name of the index is the same as the name of the constraint.)
DEFERRABLE: Indicates that constraint checking can be deferred until the end of the transaction by using the SET CONSTRAINT command
NOT DEFERRABLE: Indicates that this constraint is checked at the end of each DML statement (A NOT DEFERRABLE constraint cannot be deferred by sessions or transactions. NOT DEFERRABLE is the default.)
INITIALLY IMMEDIATE: Indicates that at the start of every transaction, the default is to check this constraint at the end of every DML statement (If no INITIALLY clause is specified, INITIALLY IMMEDIATE is the default.)
INITIALLY DEFERRED: Implies that this constraint is DEFERRABLE and specifies that, by default, the constraint is checked only at the end of each transaction
DISABLE: Disables the integrity constraint (If an integrity constraint is disabled, the Oracle server does not enforce it.)
Using Oracle Enterprise Manager to Define Constraints
From the OEM Console:
Navigate to Databases > Schema > Table.
Select Create from the right-mouse menu.
Complete appropriate information in the General page.
Select the Constraints page and define integrity constraints.
Click Create.
Table constraint:
A table constraint is part of the table definition. This can define any type of constraint except a NOT NULL constraint. This is defined using the following syntax:
[CONSTRAINT constraint]
{PRIMARY KEY (column [, column ]... )
[USING INDEX index_clause]
|UNIQUE (column [, column ]... )
[USING INDEX index_clause]
|FOREIGN KEY (column [, column ]... )
REFERENCES [schema.]table [(column [, column ]... )]
[ON DELETE CASCADE]
|CHECK (condition)
}
[constraint_state]
Note
It is a good practice to adopt a standard naming convention for constraints. This is especially true with CHECK constraints because the same constraint can be created several times with different names.
Table constraints are needed in the following cases:
When a constraint names two or more columns
When a table is altered to add any constraint other than the NOT NULL constraint
Defining a constraint from the type NOT NULL after creating a table is possible only with:
ALTER TABLE table MODIFY column CONSTRAINT constraint NOT NULL;
Defining Constraints After Creating a Table: Example
SQL> ALTER TABLE hr.employee
2 ADD(CONSTRAINT employee_dept_id_fk FOREIGN KEY(dept_id)
3 REFERENCES hr.department(id)
4 DEFERRABLE INITIALLY DEFERRED);
Note: The EXCEPTIONS clause, discussed under “Enabling Constraints” later in this lesson, can be used to identify rows which violate a constraint that is added by using the ALTER TABLE command.
Guidelines for Defining Constraints

Guidelines for Defining Constraints
The following guidelines are useful when defining constraints:
Place indexes that are used to enforce primary key and unique constraints in a tablespace different from that of the table. You can do this either by specifying the USING INDEX clause or by creating the table, creating the index, and altering the table to add or enable the constraint.
If data is frequently loaded in bulk into a table, it is preferable to disable the constraints, perform the load, and then enable the constraints. If a unique index is used to enforce a primary key or unique constraint, then this index must be dropped when the constraint is disabled. Performance can be enhanced by using a nonunique index for enforcement of primary key or unique constraints in such situations: either create the key as deferrable or create the index before defining or enabling the key.
If a table contains a self-referencing foreign key, use one of the following methods to load data:
Define or enable the foreign key after the initial load.
Define the constraint as a deferrable constraint.
The second method is useful if data loads are performed frequently.
Enabling Constraints

Enabling Constraints
A constraint that is currently disabled can be enabled in one of the two ways: ENABLE NOVALIDATE or ENABLE VALIDATE
Enable NOVALIDATE:
For PRIMARY KEY and UNIQUE constraints that have an existing index, enabling a NOVALIDATE constraint is much faster than enabling a VALIDATE constraint because existing data is not checked for constraint violation if the constraint is deferrable. If this option is used for enabling a constraint, no locks are required on the table. This method is appropriate where there is a lot of DML activity on a table, as in the case of an OLTP environment.
The following command can be used to enable a ENABLE NOVALIDATE constraint:
ALTER TABLE [ schema. ] table
ENABLE NOVALIDATE {CONSTRAINT constraint
| PRIMARY KEY
| UNIQUE ( column [, column ] ... ) }
[ USING INDEX index_clause ]
Restrictions:
The USING INDEX clause is applicable only for primary key or unique constraints that were created as deferrable, and when one of the following is true:
The constraints were created disabled.
The constraints were disabled and the index was dropped.
However, if the index needs to be created, then using this method of enabling a constraint does not offer any significant benefit over ENABLE VALIDATE because the Oracle server locks the table to build the index.
Note: Disabling constraints is covered in the course Introduction to SQL and PL/SQL.
Using Oracle Enterprise Manger to Define Constraints
From the OEM Console:
Navigate to Databases > Schema > Table.
Select the table in which the constraints are to be modified.
Click the Constraints tab, and make the modifications.
Click Apply.
Enabling Constraints

Enabling Constraints
Enabling a VALIDATE constraint checks existing data for constraint violation. This is the default when a constraint is enabled. If executed when the constraint is disabled, it has the following effects:
The table is locked and changes to the table are prevented until validation of existing data is complete.
The Oracle server creates an index if one does not exist on the index columns. It creates a unique index while enabling a primary key or unique constraint that is nondeferrable. A nonunique index is built for a deferrable primary key or a unique constraint.
If this command is executed when a constraint is enforced, then it does not require any table locks during validation. The enforced constraint guarantees that no violations are introduced during validation. This has the following advantages:
All constraints are enabled concurrently.
Each constraint is internally parallelized.
Concurrent activity on the table is permitted.
Use the following command to enable a constraint ENABLE VALIDATE:
ALTER TABLE [ schema. ] table
ENABLE [ VALIDATE ]{CONSTRAINT constraint
| PRIMARY KEY
| UNIQUE ( column [, column ] ... ) }
[ USING INDEX index_clause ]
[ EXCEPTIONS INTO [ schema. ] table ]
Note:
The VALIDATE option is the default and does not need to be specified when enabling a constraint that is disabled.
If data in the table violates the constraint, then the statement is rolled back and the constraint remains disabled.
The use of the EXCEPTIONS clause is discussed in the following section.
Using the EXCEPTIONS Table

How to Identify Row Violation
The EXCEPTIONS clause identifies any row that violates an enabled constraint. Use the following procedure to detect constraint violations, rectify them, and reenable a constraint:
1. If the EXCEPTIONS is not already created, run the utlexcpt1.sql script:
SQL> @?/rdbms/admin/utlexcpt1
Statement processed.
SQL> DESCRIBE exceptions
Name Null? Type
-------------------------- ------- ----------------
ROW_ID ROWID
OWNER VARCHAR2(30)
TABLE_NAME VARCHAR2(30)
CONSTRAINT VARCHAR2(30)
Note: The exact name and location of the utlexcpt1.sql script is specific to the operating system. For more information, see your operating system–specific Oracle documentation.
2. Execute the ALTER TABLE command using the EXCEPTIONS clause:
SQL> ALTER TABLE hr.employee
2 ENABLE VALIDATE CONSTRAINT employee_dept_id_fk
3 EXCEPTIONS INTO system.exceptions;
ALTER TABLE hr.employee
*
ORA-02298: cannot enable (HR.EMPLOYEE_DEPT_ID_FK) - parent keys not found
If the EXCEPTIONS table is not qualified with the name of the owner, it must belong to the owner of the table that is being altered.
Rows are inserted into the EXCEPTIONS table. If you are rerunning the command, truncate the EXCEPTIONS table to remove all existing rows.
3. Identify invalid data by using a subquery on the EXCEPTIONS table:
SQL> SELECT rowid, id, last_name, dept_id
2 FROM hr.employee
3 WHERE ROWID in (SELECT row_id
4 FROM exceptions)
5 FOR UPDATE;
ROWID ID LAST_NAME DEPT_ID
------------------ ---- --------- -------
AAAAeyAADAAAAA1AAA 1003 Pirie 50
1 row selected.
4. Correct the errors in the data:
SQL> UPDATE hr.employee
2 SET dept_id=10
3 WHERE rowid=’AAAAeyAADAAAAA1AAA’;
1 row processed.
SQL> COMMIT;
Statement processed.
5. Truncate the EXCEPTIONS table and reenable the constraint:
SQL> TRUNCATE TABLE exceptions;
Statement processed.
SQL> ALTER TABLE hr.employee
2 ENABLE VALIDATE CONSTRAINT employee_dept_id_fk
3 EXCEPTIONS INTO system.exceptions;
Statement processed.
Obtaining Constraint Information
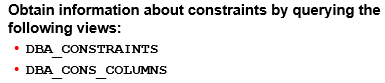
Obtaining Constraint Information
Use the following query to obtain the names, types, and statuses of all constraints on HR’s EMPLOYEES table:
SQL> SELECT constraint_name, constraint_type, deferrable,
2 deferred, validated
3 FROM dba_constraints
4 WHERE owner='HR'
5 AND table_name='EMPLOYEES';
CONSTRAINT_NAME C DEFERRABLE DEFERRED VALIDATED
---------------- - --------------- ----------- ----------
EMPLOYEE_DEPT.. R DEFERRABLE DEFERRED VALIDATED
EMPLOYEE_ID_PK P DEFERRABLE IMMEDIATE VALIDATED
SYS_C00565 C NOT DEFERRABLE IMMEDIATE VALIDATED
3 rows selected.
The following table shows the columns in the DBA_CONSTRAINTS view that are not self-evident:
Finding primary key–foreign key relationships:
To find foreign keys on HR’s EMPLOYEE table and the parent constraints, use the following query:
SQL> SELECT c.constraint_name AS "Foreign Key",
2 p.constraint_name AS "Referenced Key",
3 p.constraint_type,
4 p.owner,
5 p.table_name
6 FROM dba_constraints c, dba_constraints p
7 WHERE c.owner='HR'
8 AND c.table_name='EMPLOYEE'
9 AND c.constraint_type='R'
10 AND c.r_owner=p.owner
11 AND c.r_constraint_name = p.constraint_name;
Foreign Key Referenced Key C OWNER TABLE_NAME
------------ -------------- - ---------- ----------
EMPLOYEES_DEPT.. DEPT_PK P HR DEPARTMENT
1 row selected.
Summary
In this lesson, you should have learned how to:
Implement data integrity
Use an appropriate strategy to create and maintain constraints
Obtain information from the data dictionary
Practice 13 Overview
This practice covers the following topics:
Creating constraints
Enabling unique constraints
Creating an EXCEPTIONS table
Identifying existing constraint violations in a table, correcting the errors, and reenabling the constraints
Practice 13: Managing Data Integrity
1 Examine the lab13_01.sql script. Run the script to create the constraints.
2 Query the data dictionary to:
a Check for constraints, whether they are deferrable, and their status
Hint: Use the DBA_CONSTRAINTS view to get this information.
b Check the names and types of indexes created to validate the constraints
Hint: The indexes are created only for primary key and unique constraints and have the same name as the constraints.
3 As user SYSTEM, run the lab13_03.sql script to insert two records into the PRODUCTS table.
4 Enable the unique constraint on the PRODUCT table. Was it successful?
5 a Ensure that new rows that were added to the table do not violate the constraint on the
PRODUCT table.
Hint: This can be done by enabling the NOVALIDATE constraint.
b Query the data dictionary to verify the effect of the change.
c Test that the constraint disables inserts that violate the change by adding a
row with the following values:
6 Take the necessary steps to identify existing constraint violations in the PRODUCTS
table, modify product codes as needed, and guarantee that all existing, as well as new
data does not violate the constraint. (Assume that the table has several thousands of
rows and it is too time-consuming to verify each row manually.)
Hint: Use the following steps:
a Create the EXCEPTIONS table.
b Run the command to enable the constraint and trap the exceptions.
6 c Use the ROWIDs in the EXCEPTIONS table to list the rows in the PRODUCTS table that violate the constraint. Do not list large object (LOB) columns.
d Rectify the errors.
e Enable the constraint.
7 Run the lab13_07.sql script to insert rows into the table. Were the inserts
successful? Roll back the changes.
Download Link:


0 Comments