
Managing Tables
DownLoad Link at the Last:
Youtube Video Link:
Objectives
After completing this lesson, you should be able to do the following:
Identify the various methods of storing data
Outline Oracle data types
Distinguish between an extended versus a restricted ROWID
Outline the structure of a row
Create regular and temporary tables
Manage storage structures within a table
Reorganize, truncate, drop a table
Drop a column within a table
Storing User Data

Storing User Data
There are several methods of storing user data in an Oracle database:
Regular tables
Partitioned tables
Index-organized tables
Clustered tables
Note: Partitioned tables, index-organized tables, and clustered tables are covered in other courses.
Regular table:
A regular table (generally referred to as a “table”) is the most commonly used form of storing user data. This is the default table and is the main focus of discussion in this lesson. A database administrator has very limited control over the distribution of rows in a table. Rows can be stored in any order depending on the activity in the table
Partitioned table:
A partitioned table enables the building of scalable applications. It has the following characteristics:
A partitioned table has one or more partitions, each of which stores rows that have been partitioned using range partitioning, hash partitioning, composite partitioning, or list partitioning.
Each partition in a partitioned table is a segment and can be located in a different tablespace.
Partitions are useful for large tables that can be queried or manipulated using several processes concurrently.
Special commands are available to manage partitions within a table.
Index-organized table:
An index-organized table is like a heap table with a primary key index on one or more of its columns. However, instead of maintaining two separate storage spaces for the table and a B-tree index, an index-organized table maintains a single B-tree containing the primary key of the table and other column values. An overflow segment may exist due to the PCTTHRESHOLD value being set and the result of longer row lengths requiring the overflow area.
Index-organized tables provide fast key-based access to table data for queries involving exact matches and range searches.
Also, storage requirements are reduced because key columns are not duplicated in the table and index. The remaining non-key columns are stored in the index unless the index entry becomes very large; in that case, the Oracle server provides an OVERFLOW clause to handle the problem.
Clustered table:
A clustered table provides an optional method for storing table data. A cluster is made up of a table or group of tables that share the same data blocks, which are grouped together because they share common columns and are often used together.
Clusters have the following characteristics:
Clusters have a cluster key, which is used to identify the rows that need to be stored together.
The cluster key can consist of one or more columns.
Tables in a cluster have columns that correspond to the cluster key.
Clustering is a mechanism that is transparent to the applications using the tables. Data in a clustered table can be manipulated as though it were stored in a regular table.
Updating one of the columns in the cluster key may migrate the row.
The cluster key is independent of the primary key. The tables in a cluster can have a primary key, which may be the cluster key or a different set of columns.
Clusters are usually created to improve performance. Random access to clustered data may be faster, but full table scans on clustered tables are generally slower.
Clusters renormalize the physical storage of tables without affecting the logical structure.
Oracle Built-in Data Types
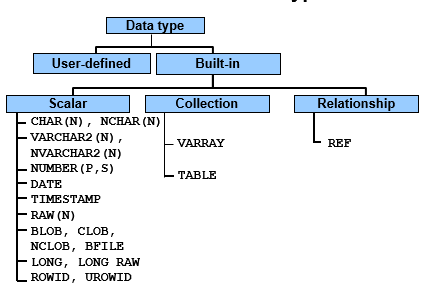
Oracle Built-in Data Types
The Oracle server provides several built-in data types to store scalar data, collections, and relationships.
Scalar data types:
Character data: Character data can be stored as either fixed-length or variable-length strings in the database.
Fixed-length character data types, such as CHAR and NCHAR, are stored with padded blanks. NCHAR is a Globalization Support data type that enables the storage of either fixed-width or variable-width character sets. The maximum size is determined by the number of bytes required to store one character, with an upper limit of 2,000 bytes per row. The default is one character or one byte, depending on the character set.
Variable-length character data types use only the number of bytes needed to store the actual column value, and can vary in size for each row, up to 4,000 bytes. VARCHAR2 and NVARCHAR2 are examples of variable-length character data types.
Numeric data type: Numbers in an Oracle database are always stored as variable-length data. They can store up to 38 significant digits. Numeric data types require:
One byte for the exponent
One byte for every two significant digits in the mantissa
One byte for negative numbers if the number of significant digits is less than 38 bytes
DATE data type: The Oracle server stores dates in fixed-length fields of seven bytes. An Oracle DATE always includes the time.
TIMESTAMP data type: This data type stores the date and time including fractional seconds up to nine decimal places. TIMESTAMP WITH TIME ZONE and TIMESTAMP WITH LOCAL TIME ZONE can use time zones to factor items such as daylight savings time. TIMESTAMP and TIMESTAMP WITH LOCAL TIME ZONE can be used in primary keys, TIMESTAMP WITH TIME ZONE cannot.
RAW data type: This data type enables the storage of small binary data. The Oracle server does not perform character set conversion when RAW data is transmitted across machines in a network or if RAW data is moved from one database to another using Oracle utilities. The number of bytes needed to store the actual column value, and can vary in size for each row, up to 2,000 bytes.
LONG, LONG RAW, and Large Object (LOBs) data types:
Oracle provides six data types for storing LOBs:
CLOB and LONG for large fixed-width character data
NCLOB for large fixed-width national character set data
BLOB and LONG RAW for storing unstructured data
BFILE for storing unstructured data in operating system files
LONG and LONG RAW data types were previously used for unstructured data, such as binary images, documents, or geographical information, and are primarily provided for backward compatibility. These data types are superseded by the LOB data types. LOB data types are distinct from LONG and LONG RAW, and they are not interchangeable. LOBs will not support the LONG application programming interface (API), and vice versa.
It is beneficial to discuss LOB functionality in comparison to the older types (LONG and LONG RAW). Below, LONGs refers to LONG and LONG RAW, and LOBs refer to all LOB data types.
LOBs store a locator in the table and the data elsewhere, unless the size is less than the maximum size for a VARCHAR2 data type, which is 4,000 bytes; LONGs store all data in-line. In addition, LOBs allow data to be stored in a separate segment and tablespace, or in a host file.
LOBs support object type attributes (except NCLOBs) and replication; LONGs do not.
LONGs are primarily stored as chained row pieces, with a row piece in one block pointing to the next row piece stored in another block. Therefore, they need to be accessed sequentially. In contrast, LOBs support random piece-wise access to the data through a file-like interface.
ROWID and UROWID data types:
ROWID is a data type that can be queried along with other columns in a table. It has the following characteristics:
ROWID is a unique identifier for each row in the database.
ROWID is not stored explicitly as a column value.
Although the ROWID does not directly give the physical address of a row, it can be used to locate the row.
ROWID provides the fastest means of accessing a row in a table.
ROWIDs are stored in indexes to specify rows with a given set of key values.
With release Oracle8.1, the Oracle server provides a single datatype called the universal ROWID or UROWID. It supports ROWIDs of foreign tables (non-Oracle tables) and can store all kinds of ROWIDs. For example: A UROWID datatype is required to store a ROWID for rows stored in an index-organized table (IOT). The value of the parameter COMPATIBLE must be set to Oracle8.1 or higher to use UROWID.
Collection data types:
Two types of collection data types are available to store data that is repetitive for a given row in a table. Prior to Oracle8i, the Objects option was needed to define and use collections. A brief discussion of these types follows.
Varying arrays (VARRAY): Varying arrays are useful to store lists that contain a small number of elements, such as phone numbers for a customer.
VARRAYs have the following characteristics:
An array is an ordered set of data elements.
All elements of a given array are of the same data type.
Each element has an index, which is a number corresponding to the position of the element in the array.
The number of elements in an array determines the size of the array.
The Oracle server allows arrays to be of variable size, which is why they are called VARRAYs, but the maximum size must be specified when declaring the array type.
Nested tables: Nested tables provide a means of defining a table as a column within a table. They can be used to store sets that may have a large number of records such as number of items in an order.
Nested tables generally have the following characteristics:
A nested table is an unordered set of records or rows.
The rows in a nested table have the same structure.
Rows in a nested table are stored separate from the parent table with a pointer from the corresponding row in the parent table.
Storage characteristics for the nested table can be defined by the database administrator.
There is no predetermined maximum size for a nested table.
Relationship data types (REFs):
Relationship types are used as pointers within the database. The use of these types requires the Objects option. As an example, each item that is ordered could point to or reference a row in the PRODUCTS table, without having to store the product code.
Oracle user-defined data types:
The Oracle server allows a user to define abstract data types and use them within the application.
ROWID Format

ROWID Format
An extended ROWID needs 10 bytes of storage on disk and is displayed by using 18 characters. It consists of the following components:
Data object number: Is assigned to each data object, such as table or index when it is created, and it is unique within the database
Relative file number: Is unique to each file within a tablespace
Block number: Represents the position of the block, containing the row, within the file
Row number: Identifies the position of the row directory slot in the block header
Internally, the data object number needs 32 bits, the relative file number needs 10 bits, block number needs 22 bits, and the row number needs 16 bits, adding up to a total of 80 bits or 10 bytes.
An extended ROWID is displayed using a base-64 encoding scheme, which uses six positions for the data object number, three positions for the relative file number, six positions for the block number, and three positions for the row number. The base-64 encoding scheme uses characters A-Z, a-z, 0-9, and /. This is a total of 64 characters, as in the following example:
SQL> SELECT department_id, rowid FROM hr.departments;
DEPARTMENT_ID ROWID
------------- ------------------
10 AAABQMAAFAAAAA6AAA
20 AAABQMAAFAAAAA6AAB
30 AAABQMAAFAAAAA6AAC
40 AAABQMAAFAAAAA6AAD
50 AAABQMAAFAAAAA6AAE
60 AAABQMAAFAAAAA6AAF
…
In this example:
AAABQM is the data object number
AAF is the relative file number
AAAAA6 is the block number
AAA is the row number for the department with ID = 10
Restricted ROWID in Oracle7 and earlier:
Versions of the Oracle database prior to Oracle8 used the restricted ROWID format. A restricted ROWID used only six bytes internally and did not contain the data object number. This format was acceptable in Oracle7 or an earlier release because the file numbers were unique within a database. Thus, earlier releases did not permit more than 1,022 datafiles. Now it is the limit for a tablespace.
Even though Oracle8 removed this restriction by using tablespace-relative file numbers, the restricted ROWID is still used in objects like nonpartitioned indexes on nonpartitioned tables where all the index entries refer to rows within the same segment.
Locating a row using ROWID:
Because a segment can only reside in one tablespace, by using the data object number, the Oracle server can determine the tablespace that contains a row.
The relative file number within the tablespace is used to locate the file, the block number is used to locate the block containing the row, and the row number is used to locate the row directory entry for the row.
The row directory entry can be used to locate the beginning of the row.
Thus, ROWID can be used to locate any row within a database.
Structure of a Row

Structure of a Row
Row data is stored in database blocks as variable-length records. Columns for a row are generally stored in the order in which they are defined and any trailing NULL columns are not stored.
Note: A single byte for column length is required for non trailing NULL columns. Each row in a table has:
Row header: Used to store the number of columns in the row, the chaining information, and the row lock status
Row data: For each column, the Oracle server stores the column length and value (One byte is needed to store the column length if the column will require more than 250 bytes of storage in which case three bytes will be used for column length. The column value is stored immediately following the column length bytes.)
Adjacent rows do not need any space between them. Each row in the block has a slot in the row directory. The directory slot points to the beginning of the row.
Creating a Table

Creating a Table
The CREATE TABLE command is used to create relational tables or object tables.
Relational table: This is the basic structure to hold user data.
Object table: Is a table that uses an object type for a column definition. An object table is a table that is explicitly defined to hold the object instance of a particular type.
Note: Object tables will not be covered within this lesson.
Creating table guidelines:
Place tables in separate tablespaces.
Use locally-managed tablespaces to avoid fragmentation.
Note: Refer to the Oracle9i SQL Reference document for more information on the various clauses and parameters that can be defined when using the CREATE TABLE command.
To create a relational table in your own schema, you must have the CREATE TABLE system privilege. To create a table in another user’s schema, you must have CREATE ANY TABLE system privilege.
Note: Refer to the “Managing Privileges” lesson for details regarding granting privileges.
The example below creates a DEPARTMENTS table in a data dictionary managed tablespace.
SQL> CREATE TABLE hr.departments(
2 department_id NUMBER(4),
3 department_name VARCHAR2(30),
4 manager_id NUMBER(6),
5 location_id NUMBER(4))
6 STORAGE(INITIAL 200K NEXT 200K
7 PCTINCREASE 0 MINEXTENTS 1 MAXEXTENTS 5)
8 TABLESPACE data;
The above syntax is a subset of the CREATE TABLE clause.
STORAGE clause:
The STORAGE clause specifies storage characteristics for the table. The storage allocated for the first extent is 200 KB. When a second extent is required it will be created at 200 KB also defined by the NEXT value. When a third extent is required, it will be created at 200 KB because the PCTINCREASE has been set to zero. The maximum amount of extents that can be used is set at five, with the minimum set to one.
MINEXTENTS: This is the minimum number of extents that is to be allocated.
MAXEXTENTS: This is the maximum number of extents to be allocated. If MINEXTENTS is specified with a value greater than one and the tablespace contains more than one datafile, the extents will be spread across the different datafiles.
PCTINCREASE: This is the percent of increase in extent size after NEXT extent and thereafter.
Block utilization parameters can also be specified in the physical_attributes_clause for the table.
PCTFREE: Specifies the percentage of space in each data block of the table. The value of PCTFREE must be a value from zero to ninety-nine. A value of zero means that the entire block can be filled by inserts of new rows. The default value is 10. This value reserves 10% of each block for updates to existing rows and allows inserts of new rows to fill a maximum of 90% of each block.
PCTUSED: Specifies the minimum percentage of used space that is maintained for each data block of the table. A block becomes a candidate for row insertion when its used space falls below PCTUSED. PCTUSED is specified as integer from zero to ninety-nine and defaults to 40.
The combination of PCTFREE and PCTUSED determines whether new rows will be inserted into existing data blocks or into new bocks. The sum of these two must be equal to or less than 100. These parameters are used to utilize space within a table more efficiently.
Note: PCTUSED, FREELISTS, and FREELIST GROUPS are deprecated with the Oracle9i feature Automatic Segment-Space Management. Refer to the “Storage Structures and Relationship” lesson for details regarding this feature.
INITRANS: Specifies the initial number of transaction entries allocated within each data block allocated to the table. This value can range from 1-255 and default to one INITRANS: Ensures that a minimum number of concurrent transactions can update the block. In general, this value should not be changed from its default.
MAXTRANS: Specifies the maximum number of concurrent transaction that can update a data block allocated to the table. This limit does not apply to queries. The value can range from 1-255 and the default is a function of the data block size.
TABLESPACE clause:
The TABLESPACE clause specifies the tablespace where the table will be created. The table in the example will reside within the data tablespace. If you omit TABLESPACE, then Oracle creates the object in the default tablespace of the owner of the schema containing the table.
Note: Refer to the “Managing Tablespaces” lesson for more information regarding tablespaces.
Creating a Table
Using Oracle Enterprise Manager to Create a Table
From the OEM Console:
Note: OEM offers many options to creating a table.
Navigate to Databases > Schema > Table.
Select Create from the right-mouse menu.
Enter your table information, such as table name, tablespace, owner, columns, and data types and sizes.
Click Create.
Creating a table using the wizard:
Navigate to Databases > Schema > Table.
Select Object > Create Using Wizard.
Enter your table information, such as table name, tablespace, owner, columns, and data types and sizes.
Click Finish.
Creating a Table: Guidelines
Place tables in separate tablespaces.
Use locally-managed tablespaces to avoid fragmentation.
Use few standard extent sizes for tables to reduce tablespace fragmentation.
Creating a Table: Guidelines
Place tables in separate tablespaces, not in the tablespace that has undo segments, temporary segments, and indexes.
Place tables in locally managed tablespaces to avoid fragmentation.
Creating Temporary Tables

Creating Temporary Tables
Temporary tables can be created to hold session-private data that exists only for the duration of a transaction or session.
The CREATE GLOBAL TEMPORARY TABLE command creates a temporary table that can be transaction-specific or session-specific. For transaction-specific temporary tables, data exists for the duration of the transaction, while for session-specific temporary tables, data exists for the duration of the session. Data in a session is private to the session. Each session can only see and modify its own data. DML locks are not acquired on the data of the temporary tables. The clauses that control the duration of the rows are:
ON COMMIT DELETE ROWS: To specify that rows are only visible within the transaction
ON COMMIT PRESERVE ROWS: To specify that rows are visible for the entire session
You can create indexes, views, and triggers on temporary tables and you can also use the Export and Import utilities to export and import the definition of a temporary table. However, no data is exported, even if you use the ROWS option. The definition of a temporary table is visible to all sessions.
Setting PCTFREE and PCTUSED

Setting PCTFREE and PCTUSED
Setting PCTFREE
A higher PCTFREE affords more room for updates within a database block. Set a higher value if the table contains:
Columns that are initially NULL and later updated with a value
Columns that are likely to increase in size as a result of an update
A higher PCTFREE will result in lower block density—each block can accommodate fewer rows.
The formula specified above ensures that there is enough free space in the block for row growth.
Setting PCTUSED
Set PCTUSED to ensure that the block is returned to the free list only when there is sufficient space to accommodate an average row. If a block on the free list does not contain sufficient space for inserting a row, the Oracle server looks up the next block on the free list. This linear scan continues until either a block with sufficient space is found or the end of the list is reached. Using the formula given reduces the time taken to scan the free list by increasing the probability of finding a block with the required free space.
Note: The value for average row size can be estimated using the ANALYZE TABLE command.
Row Migration and Chaining

Row Migration and Chaining
Row Migration
If PCTFREE is set to a low value, there may be insufficient space in a block to accommodate a row that grows as a result of an update. When this happens, the Oracle server will move the entire row to a new block and leave a pointer from the original block to the new location. This process is referred to as row migration. When a row is migrated, input/output (I/O) performance associated with this row decreases because the Oracle server must scan two data blocks to retrieve the data.
Row Chaining
Row chaining occurs when a row is too large to fit into any block. This might occur when the row contains columns that are very long. In this case, the Oracle server divides the row into smaller chunks called row pieces. Each row piece is stored in a block along with the necessary pointers to retrieve and assemble the entire row. Row chaining can be minimized by choosing a higher block size or by splitting the table into multiple tables with fewer columns, if possible.
Note: Row migration and row chaining are covered in more detail in the Oracle9i Database Performance Tuning course.
Changing Storage and Block Utilization Parameters

Changing Storage and Block Utilization Parameters
Some of the storage parameters and any of the block utilization parameters can be modified by using the ALTER TABLE command.
Syntax:
ALTER TABLE [schema.]table
{[ storage-clause ]
[ INITRANS integer ]
[ MAXTRANS integer]}
The effects of changing storage parameters:
The parameters that can be modified and the implications of the modifications are as follows:
NEXT: When the Oracle server allocates another extent for the table, the new value will be used. Subsequent extent sizes will increase by PCTINCREASE.
PCTINCREASE: A change in PCTINCREASE will be registered in the data dictionary. It will be used to recalculate NEXT when the next extent is allocated by the Oracle server. Consider a case where a table with two extents has NEXT=10K and PCTINCREASE=0. If PCTINCREASE is changed to 100, the third extent to be allocated will be 10 KB, the fourth extent will be 20 KB, the fifth extent will be 40 KB, and so on.
MINEXTENTS: The value of MINEXTENTS can be changed to any value that is less than or equal to the current number of extents in the table. It will have no immediate effect on the table, but will be used if the table is truncated.
MAXEXTENTS: The value of MAXEXTENTS can be set to any value equal to or greater than the current number of extents for the table. The value can also be set to UNLIMITED.
Restrictions:
The value of INITIAL cannot be modified for a table.
The value of NEXT specified will be rounded to a value that is a multiple of the block size greater than or equal to the value specified.
Using Oracle Enterprise Manager to Change Storage Parameters
Using Oracle Enterprise Manager to Change Storage Parameters
From the OEM Console:
Navigate to Databases > Schema > Table.
Expand the Schema name.
Select the table.
Modify the values in the Storage page. Note that the minimum extents and initial number of transactions cannot be modified using this method.
Click Apply.
Manually Allocating Extents

Manually Allocating Extents
Extents may need to be allocated manually:
To control the distribution of extents of a table across files
Before loading data in bulk to avoid dynamic extension of tables
Syntax
Use the following command to allocate an extent to a table:
ALTER TABLE [schema.]table
ALLOCATE EXTENT [ ([SIZE integer [K|M]]
[ DATAFILE ‘filename’ ]) ]
If SIZE is omitted, the Oracle server will use the NEXT_EXTENT size from DBA_TABLES to allocate the extent.
The file specified in the DATAFILE clause must belong to the tablespace that the table belongs to. Otherwise, the statement will generate an error. If the DATAFILE clause is not used, the Oracle server will allocate the extent in one of the files in the tablespace containing the table.
Note: The NEXT_EXTENT value in DBA_TABLES will not be affected by manual extent allocation. The Oracle server will not recalculate the size of the next extent when this command is executed..
Nonpartitioned Table Reorganization

Nonpartitioned Table Reorganization
A nonpartitioned table can be moved without having to run the Export or Import utility. In addition, it allows the storage parameters to be changed. This is useful when:
Moving a table from one tablespace to another
Reorganizing the table to eliminate row migration
After moving a table you will have to rebuild the indexes to avoid the following error:
SQL> SELECT * FROM employees WHERE id=23;
select * from employees where id=23
*
ERROR at line 1:
ORA-01502: index ‘HR.EMPLOYEES_ID_PK' or partition of such index is in unusable state
Truncating a Table

Truncating a Table
Syntax:
TRUNCATE TABLE [schema.] table
[{DROP | REUSE} STORAGE]
The effects of using this command are as follows:
All rows in the table are deleted.
No undo data is generated and the command commits implicitly because TRUNCATE TABLE is a DDL command.
Corresponding indexes are also truncated.
A table that is being referenced by a foreign key cannot be truncated.
The delete triggers do not fire when this command is used.
Dropping a Table

Dropping a Table
A table may be dropped if it is no longer needed or if it is to be reorganized.
Syntax:
Use the following command to drop a table:
DROP TABLE [schema.] table
[CASCADE CONSTRAINTS]
When a table is dropped, the extents used by the table are released. If they are contiguous, they may be coalesced either automatically or manually at a later stage.
The CASCADE CONSTRAINTS option is necessary if the table is the parent table in a foreign key relationship.
Note: Refer to the “Maintaining Data Integrity” lesson for details regarding CASCADE CONSTRAINTS.
Using Oracle Enterprise Manager to Drop a Table
From the OEM Console:
Navigate to Databases > Schema > Table.
Expand the Schema containing the table you wish to drop.
Expand the Schema name.
Select the table.
Select Remove from the right-mouse menu.
Select Yes to confirm drop.
Dropping a Column

Dropping a Column
The Oracle server enables you to drop columns from rows in a table. Dropping columns cleans unused and potentially space-demanding columns without having to export or import data, and recreate indexes and constraints.
Dropping a column can take a significant amount of time because all the data for the column is deleted from the table.
Before Oracle8i, it was not possible to drop a column from a table.
Using a checkpoint when dropping a column:
Dropping a column can be time consuming and requires a large amount of undo space. While dropping columns from large tables, checkpoints can be specified to minimize the use of undo space. In the example in the slide, a checkpoint occurs every 1,000 rows. The table is marked INVALID until the operation completes. If the instance fails during the operation, the table remains INVALID on start up, and the operation will have to be completed.
Use the following statement to resume an interrupted drop operation:
SQL> ALTER TABLE hr.employees DROP COLUMNS CONTINUE;
Use of this will generate an error if the table is in a VALID state.
Dropping a Column
Using Oracle Enterprise Manager to Drop a Column:
From the OEM Console:
Navigate to Databases > Schema > Table.
Expand the Schema containing the table you wish to drop.
Expand the Schema name.
Select the table.
Select Edit/View Details from the right-mouse menu.
Select the column to be dropped.
Select Drop Column from right-mouse menu.
Using the UNUSED Option

Using the UNUSED Option
Instead of removing a column from a table, the column can be marked as unused and then removed later. This has the advantage of being relatively quick, as it does not reclaim the disk space because the data is not removed. Columns that are marked as unused can be removed at a later time from the table when there is less activity on the system.
Unused columns act as if they are not part of the table. Queries cannot see data from unused columns. In addition, the names and data types of those columns are not displayed when a DESCRIBE command is executed. A user can add a new column with the same name as an unused column.
An example of setting a column to unused before dropping it is if you want to drop two columns in the same table. When you drop two columns, all rows in the table are updated twice. But, when you set the columns to unused and then drop the columns, the rows will be updated only once.
Identifying Tables with Unused Columns
To identify tables with unused columns, you can query the view DBA_UNUSED_COL_TABS. It obtains the names of tables that have unused columns and the number of columns that are marked unused. The following query shows that the table EMPLOYEES owned by HR has one unused column:
SQL > SELECT * FROM dba_unused_col_tabs;
OWNER TABLE_NAME COUNT
----- -------------- ------
HR EMPLOYEES 1
To identify tables that have partially completed DROP COLUMN operations the DBA_PARTIAL_DROP_TABS view can be queried.
SQL > SELECT * FROM dba_partial_drop_tabs;
OWNER TABLE_NAME COUNT
----- -------------- ------
no rows selected
Restrictions on Dropping a Column
You cannot do the following:
Drop a column from an object type table
Drop columns from nested tables
Drop all columns in a table
Drop a partitioning key column
Drop a column from tables owned by SYS
Drop a column from an index-organized table if the column is a primary key
A LONG or LONG RAW column that is unused but not dropped will prevent an add of a LONG or LONG RAW column to the table. (This is true even though a describe of the table appears to show no LONG or LONG RAW column.)
Obtaining Table Information
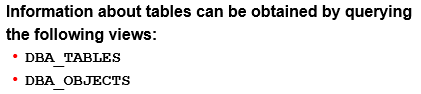
Obtaining Table Information
Information about tables can be obtained from the data dictionary. To obtain the data object number and the location of the table header for all tables owned by HR, use the following query:
SQL > SELECT table_name FROM dba_tables WHERE owner = 'HR';
TABLE_NAME
-------------------
COUNTRIES
DEPARTMENTS
DEPARTMENTS_HIST
EMPLOYEES
EMPLOYEES_HIST
JOBS
JOB_HISTORY
LOCATIONS
REGIONS
SQL> SELECT object_name, created
2 FROM DBA_OBJECTS
3 WHERE object_name like 'EMPLOYEES'
4 AND owner = 'HR';
OBJECT_NAME CREATED
----------- ---------
EMPLOYEES 16-APR-01
Summary
In this lesson, you should have learned how to:
Distinguish between an extended versus a restricted ROWID
Outline the structure of a row
Create regular and temporary tables
Manage storage structures within a table
Reorganize, truncate, and drop a table
Drop a column within a table
Practice 11 Overview
This practice covers the following topics:
Creating a table
Viewing, marking as unused, and dropping columns within a table
Allocating extents manually
Truncating a table
Obtaining table information
Practice 11 Overview
Note: Practice can be accomplished using SQL*Plus or using Oracle Enterprise Manager and SQL*Plus Worksheet.
Practice 11: Managing Tables
1 Create the following tables as user SYSTEM for an order entry system that you are
implementing now. The tables and the columns are shown below:
Note: When using OEM be sure to set DATE_OF_DELY to NULLs.
You have been informed that in the table ORDERS, rows will be inserted without a
value for DATE_OF_DELY, and it will be updated when the order is fulfilled. Use
tablespace USERS. You can use the default storage settings.
2 Run the script lab11_02.sql to insert rows into the tables.
3 Find which files and blocks contain the rows for the orders table.
Hint: Query the data dictionary view DBA_EXTENTS.
4 Check the number of extents used by the table ORDERS.
5 Allocate an extent manually, with default size, for the table ORDERS and confirm
that the extent has been added as specified.
6 Create another table, ORDERS2 as copy of the ORDERS table in the USERS tablespace, with MINEXTENTS equal to 10. Verify that the table has been created with the specified number of extents.
7 Truncate the table ORDERS without releasing space and check the number of extents to
verify extents have not been deallocated.
8 Truncate the ORDERS2 table, releasing space. How many extents does the table have
now?
9 Run the script lab11_09.sql to insert some rows into the ORDERS2 table.
10 View the columns for the ORDERS2 table. Then mark the DATE_OF_DELY column
as UNUSED. View the columns for the ORDERS2 table again. What happens?
11 Drop the unused column DATE_OF_DELY.
12 Drop the ORDERS2 table.
Download Link:


0 Comments