
Managing Tablespaces and Datafiles
DownLoad Link at the Last:
Youtube Video Link:
Lecture 15
Lecture 16
Objectives
After completing this lesson, you should be able to do the following:
Define the purpose of tablespaces and datafiles
Create tablespaces
Manage tablespaces
Create and manage tablespaces using Oracle Managed Files (OMF)
Tablespaces and Datafiles

Tablespaces and Datafiles
Databases, tablespaces, and datafiles are closely related, but they have important differences:
An Oracle database consists of one or more logical storage units called tablespaces, which collectively store all of the database’s data.
Each tablespace in an Oracle database consists of one or more files called datafiles, which are physical structures that conform with the operating system in which Oracle is running.
A database’s data is collectively stored in the datafiles that constitute each tablespace of the database. For example, the simplest Oracle database would have one tablespace and one datafile. Another database can have three tablespaces, each consisting of two datafiles (for a total of six datafiles).
Types of Tablespaces

Types of Tablespaces
The DBA creates tablespaces for increased control and ease of maintenance. The Oracle server perceives two types of tablespaces: SYSTEM and all others.
SYSTEM tablespace:
Created with the database
Required in all databases
Contains the data dictionary, including stored program units
Contains the SYSTEM undo segment
Should not contain user data, although it is allowed
Non-SYSTEM tablespaces:
Enable more flexibility in database administration
Separate undo, temporary, application data, and application index segments
Separate data by backup requirements
Separate dynamic and static data
Control the amount of space allocated to the user’s objects
Creating Tablespaces

Creating Tablespaces
You create a tablespace with the CREATE TABLESPACE command:
CREATE TABLESPACE tablespace
[DATAFILE clause]
[MINIMUM EXTENT integer[K|M]]
[BLOCKSIZE integer [K]]
[LOGGING|NOLOGGING]
[DEFAULT storage_clause ]
[ONLINE|OFFLINE]
[PERMANENT|TEMPORARY]
[extent_management_clause]
[segment_management_clause]
where:
Tablespace: This is the name of the tablespace to be created
DATAFILE: This specifies the datafile or datafiles that make up the tablespace
MINIMUM EXTENT: This ensures that every used extent size in the tablespace is
a multiple of the integer. Use K or M to specify this size in kilobytes or megabytes.
BLOCKSIZE: BLOCKSIZE specifies a nonstandard block size for the tablespace. In order to specify this clause, you must have the DB_CACHE_SIZE and at least one DB_nK_CACHE_SIZE parameter set, and the integer you specify in this clause must correspond with the setting of one DB_nK_CACHE_SIZE parameter setting.
LOGGING: This specifies that, by default, all tables, indexes, and partitions within the tablespace have all changes written to redo. LOGGING is the default.
NOLOGGING: This specifies that, by default, all tables, indexes, and partitions within the tablespace do not have all changes written to redo. NOLOGGING affects only some DML and DDL commands, for example, direct loads.
DEFAULT: DEFAULT specifies the default storage parameters for all objects created in the tablespace creation.
OFFLINE: This makes the tablespace unavailable immediately after creation.
PERMANENT: This specifies that the tablespace can be used to hold permanent objects.
TEMPORARY: This specifies that the tablespace be used only to hold temporary objects; for example, segments used by implicit sorts caused by an ORDER BY clause. Cannot specify EXTENT MANAGEMENT LOCAL or the BLOCKSIZE clause.
extent_management_clause: This clause specifies how the extents of the tablespace are managed. This clause is discussed in a subsequent section of this lesson.
segment_management_clause: This is relevant only for permanent, locally managed tablespaces. It lets you specify whether Oracle should track the used and free space in the segments in the tablespace using free lists or bitmaps.
datafile_clause:== filename [SIZE integer[K|M] [REUSE]
[ autoextend_clause ]
filename: This is the name of a datafile in the tablespace.
SIZE: This specifies the size of the file. Use K or M to specify the size in kilobytes or megabytes.
REUSE: This allows the Oracle server to reuse an existing file.
autoextend_clause: This clause enables or disables automatic extension of the datafile.
NEXT: This specifies the size in bytes of the next increment of disk space to be allocated automatically when more extents are required.
where:
MAXSIZE: This specifies the maximum disk space allowed for automatic extension of a datafile.
UNLIMITED: This specifies the disk space that can be allocated to the datafile, or that the tempfile is not limited.
See also: “Oracle9i SQL Reference” and “Oracle9i Concepts” for additional information.
Using Oracle Enterprise Manager to Create a Tablespace
From the OEM Console:
Navigate to Databases > Storage > Tablespaces.
Select Create from the right-mouse menu.
Complete the information in the General and Storage tabs as required for the tablespace.
Click Create.
Space Management in Tablespaces

Space Management in Tablespaces
Tablespaces allocate space in extents. Tablespaces can be created to use one of the two different methods of keeping track of free and used space:
Locally managed tablespaces: The extents are managed within the tablespace via bitmaps. Each bit in the bitmap corresponds to a block or a group of blocks. When an extent is allocated or freed for reuse, the Oracle server changes the bitmap values to show the new status of the blocks. Locally managed is the default beginning with Oracle9i.
Dictionary-managed tablespaces: The extents are managed by the data dictionary. The Oracle server updates the appropriate tables in the data dictionary whenever an extent is allocated or deallocated.
Locally Managed Tablespaces
Reduced contention on data dictionary tables
No undo generated when space allocation or deallocation occurs
No coalescing required

Locally Managed Tablespaces
The LOCAL option of the EXTENT MANAGEMENT clause specifies that a tablespace is to be locally managed. By default a tablespace is locally managed.
extent_management_clause:
[ EXTENT MANAGEMENT [ DICTIONARY | LOCAL
[ AUTOALLOCATE | UNIFORM [SIZE integer[K|M]] ] ] ]
where:
DICTIONARY: Specifies that the tablespace is managed using dictionary tables.
LOCAL: Specifies that the tablespace is locally managed via bitmaps. If you specify LOCAL, you cannot specify DEFAULT storage_clause, MINIMUM EXTENT, or TEMPORARY.
AUTOALLOCATE: Specifies that the tablespace is system managed. Users cannot specify an extent size. This is the default.
UNIFORM: Specifies that the tablespace is managed with uniform extents of SIZE bytes. Use K or M to specify the extent size in kilobytes or megabytes. The default size is 1 MB.
The EXTENT MANAGEMENT clause can be used in various CREATE commands:
For a permanent tablespace other than SYSTEM, you can specify EXTENT MANAGEMENT LOCAL in the CREATE TABLESPACE command.
For a temporary tablespace, you can specify EXTENT MANAGEMENT LOCAL in the CREATE TEMPORARY TABLESPACE command.
Advantages of locally managed tablespaces:
Locally managed tablespaces have the following advantages over dictionary-managed tablespaces:
Local management avoids recursive space management operations. This can occur in dictionary-managed tablespaces if consuming or releasing space in an extent results in another operation that consumes or releases space in an undo segment or data dictionary table.
Because locally managed tablespaces do not record free space in data dictionary tables, they reduce contention on these tables.
Local management of extents automatically tracks adjacent free space, eliminating the need to coalesce free extents.
The sizes of extents that are managed locally can be determined automatically by the system.
Changes to the extent bitmaps do not generate undo information because they do not update tables in the data dictionary (except for special cases such as tablespace quota information).
Dictionary-Managed Tablespaces
Extents are managed in the data dictionary
Each segment stored in the tablespace can have a different storage clause
Coalescing required

Dictionary-Managed Tablespaces
Segments in dictionary-managed tablespaces can have a customized storage. This storage is more flexible than locally managed tablespaces but much less efficient.
Undo Tablespace
Used to store undo segments
Cannot contain any other objects
Extents are locally managed
Can only use the DATAFILE and EXTENT MANAGEMENT clauses

Undo Tablespace
An undo tablespace is used with Automatic Undo Management. Refer to the “Managing Undo Data” lesson for more information on Automatic Undo Management.
CREATE UNDO TABLESPACE tablespace
[DATAFILE clause]
Temporary Tablespaces
Used for sort operations
Cannot contain any permanent objects
Locally managed extents recommended

Temporary Tablespaces
You can manage space for sort operations more efficiently by designating temporary tablespaces exclusively for sort segments. No permanent schema objects can reside in a temporary tablespace.
Sort, or temporary, segments are used when a segment is shared by multiple sort operations. Temporary tablespaces provide performance improvements when you have multiple sorts that are too large to fit into memory. The sort segment of a given temporary tablespace is created at the time of the first sort operation of the instance. The sort segment expands by allocating extents until the segment size is equal to or greater than the total storage demands of all of the active sorts running on that instance.
Locally managed temporary tablespaces have temporary datafiles (tempfiles), which are similar to ordinary datafiles except that:
Tempfiles are always set to the NOLOGGING mode.
You cannot make a tempfile read only.
You cannot rename a tempfile.
You cannot create a tempfile with the ALTER DATABASE command.
Tempfiles are required for read only databases.
Media recovery does not recover tempfiles.
To optimize the performance of a sort in a temporary tablespace, set the UNIFORM SIZE to be a multiple of the parameter SORT_AREA_SIZE.
Using Oracle Enterprise Manager to Create a Temporary Tablespace
From OEM Console:
Navigate to Databases > Storage > Tablespaces.
Select Create from the right-mouse menu.
Supply details in the General tab.
Select the Temporary option in the Type region.
Click the Storage tab, and enter the storage information.
Click Create.
Default Temporary Tablespace

Default Temporary Tablespace
When creating a database without a default temporary tablespace the SYSTEM tablespace is assigned to any user created without a TEMPORARY TABLESPACE clause. Also a warning is placed in the alert_sid.log stating that the SYSTEM tablespace is the default temporary tablespace. Creating a default temporary tablespace during database creation prevents the SYSTEM tablespace from being used for temporary space.
After database creation, a default temporary tablespace can be set by creating a temporary tablespace and then altering the database.
SQL> ALTER DATABASE DEFAULT TEMPORARY TABLESPACE temp;
Once defined, users who are not explicitly assigned to a temporary tablespace are assigned to the default temporary tablespace.
The default temporary database can be changed at any time by using the ALTER DATABASE DEFAULT TEMPORARY TABLESPACE command. When the default temporary tablespace is changed, all users assigned the default temporary tablespace are reassigned to the new default.
Creating a Default Temporary Tablespace

Creating a Default Temporary Tablespace
During database creation:
When creating a database without a default temporary tablespace the default tablespace, the SYSTEM tablespace is assigned to any user created without a TEMPORARY TABLESPACE clause. Also, a warning is placed in the alertSID.log stating that the SYSTEM tablespace is the default temporary tablespace.
Creating a default temporary tablespace during database creation prevents the SYSTEM tablespace from being used for temporary space. When a default temporary tablespace is created with the CREATE DATABASE command, it is of locally managed type.
Creating a Default Temporary Tablespace

Creating a Default Temporary Tablespace (continued)
After database creation:
A default temporary tablespace can be created and set by:
Using the CREATE TABLESPACE command to create a temporary tablespace
Using the ALTER DATABASE command as shown above.
Once defined, users not explicitly assigned to a temporary tablespace are assigned to the default temporary tablespace.
The default temporary tablespace can be changed at any time by using the ALTER DATABASE DEFAULT TEMPORARY TABLESPACE command. When the default temporary tablespace is changed, all users who are assigned the default temporary tablespace are reassigned to the new default.
Using Oracle Enterprise Manager to Create a Default Temporary Tablespace:
From the OEM Console:
Navigate to Databases > Storage > Tablespaces.
Select Create from the right-mouse menu.
Select Temporary and Set as Default Temporary Tablespace in the General tab.
Complete necessary information in the Storage tab.
Click Create.
Restrictions on Default Temporary Tablespace
Default temporary tablespaces cannot be:
Dropped until after a new default is made available
Taken offline
Altered to a permanent tablespace
Restrictions on Default Temporary Tablespace
Dropping a Default Temporary Tablespace
You cannot drop the default temporary tablespace until after a new default is made available. The ALTER DATABASE command must be used to change the default temporary tablespace to a new default. The old default temporary tablespace is then dropped only after a new default temporary tablespace is made available. Users assigned to the old default temporary tablespace are automatically reassigned to the new default temporary tablespace.
Changing the Type of a Default Temporary Tablespace
Because a default temporary tablespace must be either the SYSTEM tablespace or a temporary tablespace, you cannot change the default temporary tablespace to a permanent type.
Taking Default Temporary Tablespace Offline
Tablespaces are taken offline to make that part of the database unavailable to other users (for example, an offline backup, maintenance, or making a change to an application that uses the tablespace). Because none of these situations apply to a temporary tablespace, you cannot take a default temporary tablespace offline.
Read Only Tablespaces

Read Only Tablespaces
The ALTER TABLESPACE [tablespace]READ ONLY command places the tablespace in a transitional read only mode. In this transitional state, no further write operations can occur in the tablespace except for the rollback of existing transactions that previously modified blocks in the tablespace. After all of the existing transactions have been either committed or rolled back, the read only command completes, and the tablespace is placed in read only mode.
You can drop items, such as tables and indexes, from a read only tablespace, because these commands affect only the data dictionary. This is possible because the DROP command updates only the data dictionary, but not the physical files that make up the tablespace. For locally managed tablespaces, the dropped segment is changed to a temporary segment, to prevent the bitmap from being updated. To make a read only tablespace writable, all of the datafiles in the tablespace must be online. Making tablespaces read only causes a checkpoint on the datafiles of the tablespace.
Making tablespaces read only prevents further write operations on the datafiles in the tablespace. Therefore, the datafiles can reside on read only media, such as CD-ROMs or write-once (WORM) drives. Read only tablespaces eliminate the need to perform backups of large, static portions of a database.
To create a read only tablespace on a write-once read only (WORM) device:
1. ALTER TABLESPACE...READ ONLY
2. Use an operating system command to move the datafiles of the tablespace to the read only device.
3. ALTER TABLESPACE...RENAME DATAFILE
Using Oracle Enterprise Manager to Make a Tablespace Read Only
From the OEM Console:
Navigate to Databases > Storage > Tablespaces.
Select the tablespace.
Select the Read Only check box in the Status region of the General tab.
Click Apply.
Taking a Tablespace Offline

Taking a Tablespace Offline
A tablespace is normally online so that the data contained within it is available to database users. However, the database administrator might take a tablespace offline to:
Make a portion of the database unavailable, while allowing normal access to the remainder of the database
Perform an offline tablespace backup (although a tablespace can be backed up while online and in use)
Recover a tablespace or datafile while the database is open
Move a datafile while the database is open
Offline Status of a Tablespace
When a tablespace goes offline, Oracle does not permit any subsequent SQL statements to reference objects contained in that tablespace. Users trying to access objects in a tablespace that is offline receive an error.
When a tablespace goes offline or comes back online, the event is recorded in the data dictionary and in the control file. If a tablespace is offline when you shut down a database, the tablespace remains offline and is not checked when the database is subsequently mounted and reopened.
The Oracle instance automatically switches a tablespace from online to offline when certain errors are encountered (for example, when the database writer process, DBWn, fails in several attempts to write to a datafile of the tablespace). The different error situations are covered in more detail in the course Oracle9i Database Administration Fundamentals II.
Taking Tablespaces Offline
Whenever the database is open, a database administrator can take any tablespace, except the SYSTEM tablespace or any tablespace with active undo segments or temporary segments, offline. When a tablespace is taken offline, the Oracle server takes all the associated datafiles offline.
ALTER TABLESPACE tablespace
{ONLINE |OFFLINE [NORMAL|TEMPORARY|IMMEDIATE|FOR RECOVER]}
where:
NORMAL: Flushes all blocks in all datafiles in the tablespace out of the SGA. This is the default. You need not perform media recovery on this tablespace before bringing it back online. Use the NORMAL clause whenever possible.
TEMPORARY: Performs a checkpoint for all online datafiles in the tablespace even if some files could not be written. Any offline files may require media recovery.
IMMEDIATE: Does not ensure that tablespace files are available and does not perform a checkpoint. You must perform media recovery on the tablespace before bringing it back online.
FOR RECOVER: Takes tablespaces offline for tablespace point-in-time recovery.
Using Oracle Enterprise Manager to Take a Tablespace Offline
From the OEM Console:
Navigate to Databases > Storage > Tablespaces.
Select the tablespace.
In the Status region of the General tab, select Offline.
Select the Mode from the drop-down menu.
Click Apply.
Changing Storage Settings

Changing Storage Settings
Use the ALTER TABLESPACE command to alter the default storage definition of a tablespace:
ALTER TABLESPACE tablespace
[MINIMUM EXTENT integer[K|M]
|DEFAULT storage_clause ]
Using Oracle Enterprise Manager to Change the Storage Settings
From the OEM Console:
Navigate to Databases > Storage > Tablespaces.
Right-click the tablespace, and select View/Edit Details from the menu.
Click the Storage tab and make necessary changes.
Click Apply.
Resizing a Tablespace

Resizing a Tablespace
You can enlarge a tablespace in two ways:
Change the size of a datafile, either automatically or manually.
Add a datafile to a tablespace.
Enabling Automatic Extension of Datafiles

Enabling Automatic Extension of Datafiles
Specifying AUTOEXTEND for a New Datafile
The AUTOEXTEND clause enables or disables the automatic extension of datafiles. Files increase in specified increments up to a specified maximum.
Benefits of using the AUTOEXTEND clause:
Reduces need for immediate intervention when a tablespace runs out of space
Ensures applications will not halt because of failures to allocate extents
When a datafile is created, the following SQL commands can be used to enable automatic extension of the datafile:
CREATE DATABASE
CREATE TABLESPACE ... DATAFILE
ALTER TABLESPACE ... ADD DATAFILE
Use the ALTER DATABASE command to modify a datafile and enable automatic extension:
ALTER DATABASE DATAFILE filespec [autoextend_clause]
autoextend_clause:== [ AUTOEXTEND { OFF|ON[NEXT integer[K|M]] [MAXSIZE UNLIMITED | integer[K|M]] } ]
where:
AUTOEXTEND OFF: Disables the automatic extension of the datafile
AUTOEXTEND ON: Enables the automatic extension of the datafile
NEXT: Specifies the disk space to allocate to the datafile when more extents are required
MAXSIZE: Specifies the maximum disk space allowed for allocation to the datafile
UNLIMITED: Sets no limit on allocating disk space to the datafile
Specifying AUTOEXTEND for an Existing Datafile
Use the SQL command ALTER DATABASE to enable or disable automatic file extension for existing datafiles:
ALTER DATABASE [database]
DATAFILE 'filename'[, 'filename']... autoextend_clause
Determining if AUTOEXTEND is Enabled or Disabled
Query DBA_DATA_FILES view to determine whether AUTOEXTEND is enabled and examine the AUTOEXTENSIBLE column.
SQL> select tablespace_name, file_name, autoextensible
2 from dba_data_files;
TABLESPACE_NAME FILE_NAME AUTOEXTENSIBLE
--------------- ------------------------ --------------
SYSTEM /home/dba01/ORADATA/u01/system01.dbf YES
DATA01 /home/dba01/ORADATA/u04/data01.dbf NO
USERS /home/dba01/ORADATA/u03/users01.dbf NO
INDX /home/dba01/ORADATA/u06/indx01.dbf NO
SAMPLE /home/dba01/ORADATA/u02/sample01.dbf YES
DATA02 /home/dba01/ORADATA/u03/data02.dbf NO
INDEX01 /home/dba01/ORADATA/u06/index01.dbf YES
UNDO2 /home/dba01/ORADATA/u01/UNDO2.dbf NO
8 rows selected.
Specifying AUTOEXTEND for a New Datafile (continued)
Using Oracle Enterprise Manager to Enable Automatic Resizing
From the OEM Console:
Navigate to Databases > Storage > Datafiles.
Select the datafile.
In the Storage tab, select the Automatically extend datafile when full check box.
Set the values for the Increment and the Maximum Size.
Click Apply.
Manually Resizing a Datafile

Manually Resizing a Datafile
Instead of adding space to the database by adding datafiles, the DBA can change the size of a datafile. Use the ALTER DATABASE command to manually increase or decrease the size of a datafile:
ALTER DATABASE [database]
DATAFILE ‘filename’[, ‘filename’]...
RESIZE integer[K|M]
where:
Integer: Is the absolute size, in bytes, of the resulting datafile
If there are database objects stored above the specified size, then the datafile size is decreased only to the last block of the last objects in the datafile.
Adding Datafiles to a Tablespace

Adding Datafiles to a Tablespace
You can add datafiles to a tablespace to increase the total amount of disk space allocated for the tablespace with the ALTER TABLESPACE ADD DATAFILE command:
ALTER TABLESPACE tablespace
ADD DATAFILE filespec [autoextend_clause]
Using Oracle Enterprise Manager Add a Datafile
From the OEM Console:
Navigate to Databases > Storage > Tablespaces.
Select the tablespace.
Select Add Datafile.
In the General tab, enter the file information.
Click Create.
Methods for Moving Datafiles

Methods for Moving Datafiles
Depending on the type of tablespace, the database administrator can move datafiles using one of the following two methods:
The ALTER TABLESPACE Command
The following ALTER TABLESPACE command is applied only to datafiles in a non-SYSTEM tablespace that does not contain active undo or temporary segments:
ALTER TABESPACE tablespace
RENAME DATAFILE 'filename'[, 'filename']...
TO 'filename'[, 'filename']...
The source filenames must match the names stored in the control file.
Methods for Moving Datafiles
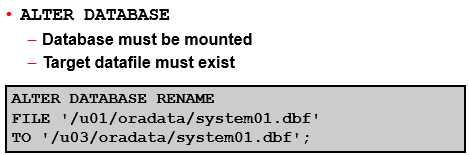
The ALTER DATABASE Command
The ALTER DATABASE command can be used to move any type of datafile:
ALTER DATABASE [database]
RENAME FILE 'filename'[, 'filename']...
TO 'filename'[, 'filename']...
Because the SYSTEM tablespace cannot be taken offline, you must use this method to move
datafiles in the SYSTEM tablespace.
Use the following process to rename files in tablespaces that cannot be taken offline:
1. Shut down the database.
2. Use an operating system command to move the files.
3. Mount the database.
4. Execute the ALTER DATABASE RENAME FILE command.
5. Open the database.
Using Oracle Enterprise Manager to Move a Datafile
From the OEM Console:
Navigate to Databases > Storage > Tablespaces.
Select the tablespace in which the datafile to be moved resides.
In the General page, select Offline.
Select Apply.
Once the tablespace is offline, update the File Directory information in the General page.
Click Apply.
Note:
These commands verify that the file exists in the new location; they do not create or move files.
Always provide complete filenames (including their paths) to identify the old and new datafiles.

Dropping Tablespaces
You can remove a tablespace from the database when the tablespace and its contents are no longer required with the following DROP TABLESPACE SQL command:
DROP TABLESPACE tablespace
[INCLUDING CONTENTS [AND DATAFILES] [CASCADE CONSTRAINTS]]
where:
tablespace: Specifies the name of the tablespace to be dropped
INCLUDING CONTENTS: Drops all the segments in the tablespace
AND DATAFILES: Deletes the associated operating system files
CASCADE CONSTRAINTS: Drops referential integrity constraints from tables outside the tablespace that refer to primary and unique keys in the tables in the dropped tablespace
Guidelines:
A tablespace that still contains data cannot be dropped without the INCLUDING CONTENTS option. This option may generate a lot of undo when the tablespace contains many objects.
After a tablespace has been dropped, its data is no longer in the database.
When a tablespace is dropped, only the file pointers in the control file of the associated database are dropped. The operating system files still exist and must be deleted explicitly using the appropriate operating system command unless the AND DATAFILES clause is used or datafiles are OMF.
Even if a tablespace is switched to read only, it can still be dropped, along with segments within it.
It is recommended that you take the tablespace offline before dropping it to ensure that no transactions access any of the segments in the tablespace.
Using Oracle Enterprise Manager to Drop a Tablespace
From the OEM Console:
Navigate to Databases > Storage > Tablespaces.
Select the tablespace.
Select Remove from the right-mouse menu.
Click Yes to confirm drop.
Managing Tablespaces Using OMF
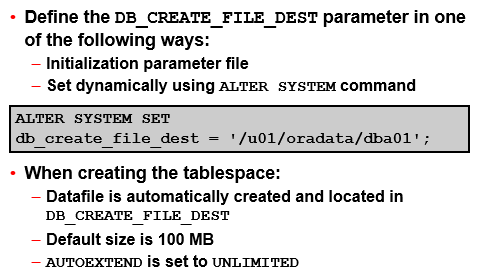
When configuring OMF for creating tablespaces, a single initialization parameter, DB_CREATE_FILE_DEST, is specified. The DATAFILE clause is not required. All datafiles are created automatically and their location is defined by DB_CREATE_FILE_DEST. The datafile filename is automatically generated by the Oracle server (ora_tbs1_2ixfh90q.dbf).
Managing Tablespaces with OMF

Managing Tablespaces with OMF
Creating OMF Tablespaces
Creating tablespaces with OMF does not require a DATAFILE clause. Tablespaces omitting the DATAFILE clause take the defaults of a 100 MB datafile set to AUTOEXTEND with an unlimited MAXSIZE. Optionally a file size may be specified.
CREATE TABLESPACE tablespace
[ DATAFILE [ filename ] [ SIZE integer [K|M] ] ];
Adding Datafiles to OMF Tablespaces
A datafile can be added to an existing tablespace. The ADD DATAFILE command no longer requires file specification.
Dynamically Changing Default File Locations
DB_CREATE_ONLINE_LOG_DEST_n should be set to prevent log files and control files from being placed with datafiles. The destination can be changed dynamically using the ALTER SYSTEM SET command.
Dropping OMF Tablespaces
Datafiles from OMF created tablespaces are deleted at the OS level when the associated tablespace is dropped.

In this lesson, you should have learned how to:
Use tablespaces to separate data
Create various types of tablespaces
Manage tablespaces
Manage tablespaces using OMF
Practice 8 Overview
This practice covers the following topics:
Creating tablespaces
Modifying tablespaces
Configuring for and creating a tablespace using OMF
Practice 8 Overview
Note: Practice can be accomplished using SQL*Plus or using Oracle Enterprise Manager and SQL*Plus Worksheet.
Practice 8: Managing Tablespaces and Datafiles
1 Create permanent tablespaces with the following names and storage:
a DATA01 data dictionary-managed.
b DATA02 locally managed with uniform sized extents. Ensure that every used extent
size in the tablespace is a multiple of 100 KB.
c INDEX01 locally managed with uniform sized extents of 4K. Enable automatic extension of 500 KB when more extents are required with a maximum size of 2 MB. d RONLY for read only tables with the default storage. DO NOT make the tablespace
read only at this time.
e Display the information from the data dictionary.
Hint: Information about tablespaces can be viewed using any of the following queries.
- DBA_TABLESPACES
- V$TABLESPACE
- V$DATAFILE
2 Allocate 500 KB more disk space to tablespace DATA02. Verify the result.
3 Relocate tablespace INDEX01 to subdirectory u06. Verify relocation and status of INDEX01.
Hints:
- Take the INDEX01 tablespace offline.
- Use V$DATAFILE to verify status.
- Use operating system move command to move the tablespace to u06.
- Use ALTER TABLESPACE to relocate the tablespace.
- Place the INDEX01 tablespace online.
- Use V$DATAFILE to verify status.
4 a Create a table in tablespace RONLY. Make tablespace RONLY read only. Run a query to verify it.
b Attempt to create an additional table TABLE2. Drop the first created table, TABLE1. What happens?
5 Drop tablespace RONLY and the associated datafile. Verify it.
6 Set DB_CREATE_FILE_DEST to $HOME/ORADATA/u05 in memory only. Create
tablespace DATA03 size 5 MB. Do not specify a file location. Verify the creation of the
datafile.
Download Link: 


0 Comments